Pages

Related Posts Plugin for WordPress, Blogger...
Showing posts with label organic. Show all posts

Tuesday, September 24, 2013

Om Home - Colorful Modern Baby Clothes

I'm digging everything about these cotton PJs and onesies from OM Home. The line was designed by two moms who love brights colors and were tired of all the pink and baby blue clothing that dominates the baby clothing market. What they created is a line of soft cottony goodness full of beautiful bright colors and a unisex signature print. I really like the Jasper cotton one-piece pj with foldover socks. Such a smart design and perfect for a baby who is learning to crawl. Yay for innovative moms!

Om Home - Organic Baby Clothes

Monday, July 29, 2013

Step by Step Organic Fabric Teething Toy Tutorial

Mr. Parks is starting to become a drool/slobber machine. I suspect that his gums are itching and he may be teething. Here are step by step instructions to create an organic fabric teething toy. Don't have the skills to make your own? You can always message me and order some.

What you will need
Organic wooden rings (I ordered mine from Alexa Organics)
Two pieces of 10 in x 4 in fabric (I used minky and organic cotton but you can use two pieces of cotton)
Fabric scissors/Rotary cutter
Pins
Cutting mat
Sewing machine
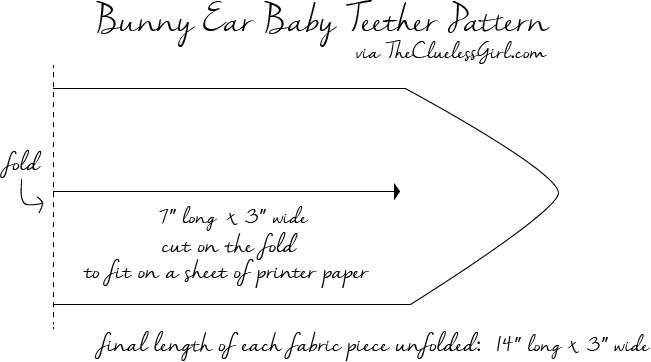
Pattern which can be downloaded here 
**It looks like the link to the original template I used is broken. Above is a link to a similar template via The Clueless Girl

Step-by-step Instructions

[A photo of everything you will need.]


[Cut out pattern and pin it to your fabric. Fabric should be laid right sides together.]


[Cut out pattern.]


[Result after cutting pattern.]


[Remove pins and pattern and sew fabrics together using a 1/4 inch seam allowance. Remember to leave an opening where indicated on pattern.]


[Flip inside out]


[Press and sew again using a 1/4 inch seam allowance.]


[Loop completed bunny ears around your wooden ring. Ta da! All done.]

Now give the teether to your baby or someone else's baby and snap some photos.


[Parks LOVED the teether.]


Saturday, July 20, 2013

DIY Easy Extra Large Minky Play Blanket

I'm a little obsessed with making these large play blankets. They are the perfect size for P who is now rolling everywhere and starting to scoot around. I've made 4 of these and I think they are going to be my go-to baby shower gift from now on. Here's a quick tutorial on how to make your own minky blanket.

Supplies Needed
Sewing machine
1 1/2 yards of cotton fabric (I ordered mine from Fabric Worm)
1 1/2 yards of minky fabric
Quilter's pins
Thread that coordinates with your fabric choices
Rotary cutter, cutting mat, acrylic ruler (I purchased this set from Joanns)

Directions

Pre wash and dry your fabric. Iron cotton fabric. Minky does not need to be ironed.


Using your cutting mat, square off your fabric. Make sure to hold your ruler with a wide hand to ensure that it doesn't move around.


After, your cotton is squared off, lay fabrics right sides together. I like to spread it out on my floor.


Pin edge of fabrics together all the way around. Pin about 1/2 inch away from edge. Leave a 6 inch hole for turning the blanket right side out. 


Trim off excess minky fabric so that both fabric pieces are the same size.


This is what your trimmed fabrics should look like.


Get your thread ready.


Using a 1/2 inch seam allowance, sew all around the edge of the blanket. Don't forget to leave that 6 inch hole open!


Flip your blanket right side out. Pin the opening so it's flush with the rest of the blanket.


Using a 1/4 inch seam allowance, top stitch around the entire blanket, making sure to close up the opening. I repeated this process 3 times to get the look I desired.


Ta da! Your banket is now complete. Time to wrap it up and give it to someone you love.


This blanket was given to baby Elijah who is just learning to roll around. We hope you enjoy the blanket baby E!


Please leave any questions or comments for me below. I'd love to see any photos of blankets you have made using this tutorial.

Don't throw away your extra minky! Another tutorial will be coming soon and you'll need your minky scraps.

Update: Baby E likes it!