Pages

Related Posts Plugin for WordPress, Blogger...
Showing posts with label DIY. Show all posts

Wednesday, October 12, 2016

Epic Octopus Costume Photos and Instructions

After many many hours of watching Jonathan Bird's Blue World videos on Youtube, Parker decided he wanted to be an octopus for Halloween this year. Not just any octopus, a blue ringed octopus. Threenagers have very specific needs. You feel me, mamas? So I said challenge accepted and started researching octopus costumes and inspo. If you follow me on Pinterest and were wondering what I was up to, now you know. There is a method to my madness! I lucked out in finding this octopus costume pattern and tutorial from Martha Stewart and the rest was history. Enjoy these snaps of my little octopus contemplating his return to the sea. All photo credits belong to my wonderful husband who is totally supportive of my crazy ideas. 

octopus costume, costume, handmade costume, halloween, toddler costume

This costume took a total of 4 hours of actual sewing and construction time. Add a few hours for the time it took for the puffy paint to dry. In total, it took me 4 days to complete the whole project because trying to find 4 hours of time to craft is nearly impossible.

octopus costume, costume, handmade costume, halloween, toddler costume

I perused the aisles of Joann's to find a solid yellow cotton similar to this and a lighter patterned yellow cotton for the interior that looked like octopus suckers. I used the instructions from this DIY Octopus Costume tutorial to add a bit of a curl to the tentacles.

octopus costume, costume, handmade costume, halloween, toddler costume

After sewing the outer part of the cape together, I pulled up a few photos of blue ringed octopuses (octopi?) and drew the blue ringed octopus pattern onto the outer part of the cape using brown and blue puffy paint. I had considered cutting the rings out of felt and sewing them on but figured puffy paint would be less time consuming. The paint actually gives the costume a cool texture too. Threenagers totally appreciate hand painted fabric, right?

octopus costume, costume, handmade costume, halloween, toddler costume

After the paint dried overnight, I finished sewing all the parts of the costume together and let Parker help me stuff the tentacles and head with poly-fil. He loved that part! Side note: the "filling tool" aka single chopstick that comes in the poly-fil bag is such a joke. HA!

octopus costume, costume, handmade costume, halloween, toddler costume

I was so happy with how the costume turned out that I made Parker and Tuan go down to La Jolla Shores to snap some photos. We arrived as the sun was setting and the tide was low. It was perfect and Tuan did a fantastic job capturing the essence of the costume.

octopus costume, costume, handmade costume, halloween, toddler costume

Now the only thing left to do is make my tiger shrimp costume and our family will be all set for Halloween. Happy crafting, everyone!

octopus costume, costume, handmade costume, halloween, toddler costume

octopus costume, costume, handmade costume, halloween, toddler costume

If you have any questions about the costume, leave a comment below!

Tuesday, September 27, 2016

Apple Balloon School Photo Prop

For Parker's first day of preschool photos I wanted to do something a little different than the chalkboard signs I've been seeing on everyone's social media feeds. What better way to celebrate the start of a school year than with a balloon! Spoiler alert: I love balloons. For this project I drew inspiration from these fab balloon projects from Design Improvised and Studio DIY. Ready to get crafting? 

First Day of School Apple Balloon

Materials needed
-Thickers Letterman sticker letters in black (also available in blue and red)
-18" round red foil balloon
-Straw
-Green card stock
-Brown card stock
-Clear tape or zots
*I bought balloon sticks thinking they would be strong enough to support my foil balloon. I was wrong! I also cut two leaves thinking that would look cute but I ended up just using one.

Instructions
-Cut a leaf shape from your green cardstock and a stem from your brown cardstock.
-Insert a straw into the hole of your balloon and inflate. No helium needed!
-Decide what you want you balloon to say. I played around with Preschool 2016 and First Day of School 2016. Cut out the letters you need and line up the words. Make sure you spelled everything right because nothing is worse than misspelled words on a back to school balloon. Nothing.
-Find the center of your balloon and start sticking your letters on. 
-Attach stem and leaf on with clear tape.
-Tape back the tag at the bottom on the balloon so everything is perfectly round. 

TADA! You now have a fab back to school photo prop. Click HERE to see P's first day of preschool photos.

photo prop, back to school photos, apple balloon

photo prop, back to school photos, apple balloon

photo prop, back to school photos, apple balloon

[Can you see me in the reflection on the balloon? Hi!]

Thursday, January 28, 2016

Ring in Lunar New Year with this Musical Chinese Pellet Drum Craft

Lunar New Year is quickly approaching and Parker and I are getting into the spirit by creating DIY pellet drums. Pellet drums are double sided with a pellet connected to each side of the drum. To play the drum, you simply turn the stick between your hands and the pellets swing back and forth, hitting drum head. This musical craft is sure to bring lots of luck and noise to your home!

Ring in the New Year with this DIY Chinese Pellet Drum Kids Craft / Kids friendly craft to celebrate the Lunar New Year 2016, the Year of the Monkey.


Materials needed
-2 Paper bowls (Paper plates would also work)
-Acrylic paint of your choice (red and gold/yellow are lucky New Year's colors)
-Paintbrush
-Tape
-Hot glue gun/craft glue
-2 Monkey images
-Wooden dowel or chopctick
-String
-2 Wooden or plastic beads

Ring in the New Year with this DIY Chinese Pellet Drum Kids Craft / Kids friendly craft to celebrate the Lunar New Year 2016, the Year of the Monkey.

Instructions
1. Paint the exterior side of the bowls and let them dry completely. The drying process will take at least 30 mins depending on how thick you lay on the paint.

Ring in the New Year with this DIY Chinese Pellet Drum Kids Craft / Kids friendly craft to celebrate the Lunar New Year 2016, the Year of the Monkey.

[This is the messiest part of the project. Parker was very concerned about the paint on his hands.]

2. Cut out the monkey images and glue them to the face of each plate.
3. Tie the beads to strings that are 2/3 the diameter of the bowl in length. If your bowl is 6 inches in diameter, your string will be 4 inches long. Adhere the end of the strings to each side of the bowl.

Ring in the New Year with this DIY Chinese Pellet Drum Kids Craft / Kids friendly craft to celebrate the Lunar New Year 2016, the Year of the Monkey.

4. Adhere the wooden dowel/chopstick to the inside of one of the plates.

Ring in the New Year with this DIY Chinese Pellet Drum Kids Craft / Kids friendly craft to celebrate the Lunar New Year 2016, the Year of the Monkey.

Ring in the New Year with this DIY Chinese Pellet Drum Kids Craft / Kids friendly craft to celebrate the Lunar New Year 2016, the Year of the Monkey.

5. Attach the 2nd bowl to the first one using a hot glue gun. 
6. We added some fun pom poms to our bowls to give them a little more flair but that is optional. 

Ring in the New Year with this DIY Chinese Pellet Drum Kids Craft / Kids friendly craft to celebrate the Lunar New Year 2016, the Year of the Monkey.

I had to reinforce Parker's stick with tape because...well because he is a toddler. Enjoy your new pellet drum! Please tag us (@parkerproject) when you post your pellet drum pictures on Instagram. 

Tuesday, October 27, 2015

Over-the-Collar Dog Bandana Tutorial


My BFF Susan has the most adorable double doodle (golden retriever x poodle x 2) named Chewy. As a first time pet parent, Susan has been spoiling Chewy with pricey accessories from Etsy. We've all been there! When I saw how much sellers were charging for dog bandanas, my first thought was, "That is crazy! I can make that!" This is a very easy project I hope you enjoy picking fabrics and patterns to make your dog the hippest on the block. 


[Follow Chewy and her adventures on IG @chewy_doodle. This cute pup has more followers than I do!]

Over-the-Collar Dog Bandana


Materials needed
-11x11 inch square of fabric (you can buy a fat quarter and trim it down or buy a 1/3 yard cut from the bolt and cut it down)
-scissors/fabric trimmer
-grid cutting mat
-fabric pencil
-ruler
-matching thread
-pins

*Note that the amount of fabric required will vary based on the size you want your bandana to be. I started with a 11x11 square in order to have the final bandana size be 9 in for Chewy who is a medium sized dog. 


Instructions

1. Cut your fabric down to size and square it off. Using the selvage edge of the fabric helps immensely.


2. Line up the square of fabric right side up on the grid of your cutting mat. Starting from the corner, mark four inches across and mark inches down. Draw a line between those two points. Do that for two opposite ends of the square. See below.


3. Fold your fabric along the line and sew flat using a 1/4 inch seam allowance. You will end up with a flat triangle on both sides of the square. Sewing the flap down makes it easier to feed the collar through later. Your square should look like this now.


4. Fold your fabric in half so the pointed ends meet. Sew the pointed end shut using a 1/2 inch seam allowance.


5. Now it's time to flip your collar inside out and sew a line about 2 inches down from the top to create a tunnel to feed your collar through. Finish your pointed end with a 1/4 inch seam allowance.  That's it! You are done. 

The first collar I attempted to make was a disaster. My 2nd attempt took 10 minutes. After the 2nd one, I was flying through my stack of squares. This really is a simple project and you can embellish your bandanas with trim, fringe and fancy patterned finishes. The fabric I used for the tutorial was cotton but you an use any material. Happy sewing, Mamas!


Tuesday, August 25, 2015

Lego Travel Box Tutorial

Forgive me for this super late post. In preparation for our Cabo trip, I made portable LEGO kits for Parker and Elijah so they would have something fun to play with on the plane. This is an easy project and you can find a full tutorial over on the Mama. Papa. Bubba. blog. Jen's instructions are easy to follow so I'll just share my buy list with you. 

Materials
Metal lunchbox (I found these in the dollar section at target)
Mounting tape
Scissors

Instructions


These kits were a big hit with the boys on the plane and throughout the trip. I'm so glad I made them!


Friday, July 17, 2015

Birthday Party in a Box Tutorial

My girlfriends and I have a tradition of shipping each other things for our birthdays since we usually only see each other 3 times a year. Flowers, cans of quail eggs, balloons; whatever the current inside joke is, it gets packed into a box and delivered.


It was my turn to put a box together for Susan and I basically went to Target and went ape shit in the party supply section to send her a birthday party in a box. This is not an original idea by any means but it sure was fun to put together and she loved it! Items included were: a mini pinata filled with "adult fun", noise makers, balloons, Funfetti cake mix, frosting, bubbles, candles, colorful straws and a birthday card.


Happy birthday, Susan! I love you BFF!!


I'm so excited about the 30th birthday trip we have planned in Cabo next week. It's going to be crazy.


Tuesday, June 16, 2015

Bacon Jam Father's Day Gift Recipe + DIY


As promised, I whipped up a BIG batch of bacon jam to give to all the special dads (and some non-dads *ahem Brandon*) that I know. So much bacon. So many onions. I walked around smelling like bacon and onions all day Saturday. Here is my spin on the original post from Fork Spoon Bacon. Happy gifting, Mamas!

Bacon Jam (I made this recipe x 3)
Ingredients
1 1/2 pounds of thick cut bacon, chopped
2 teaspoons of butter
4 large yellow onions, diced
1 teaspoon of salt
1/4 cup brown sugar
1/4 cup sherry vinegar
1 1/2 teaspoons of fresh thyme leaves, divided
1 teaspoon freshly ground black pepper
1 pinch of cayenne pepper
1/2 cup of water
2 teaspoons balsamic vinegar
2 teaspoons of extra virgin olive oil

Instructions
1. Cook bacon in heavy-bottom pot over medium heat until bacon is crispy. Pour bacon and rendered fat into a strainer placed over bowl. When fat is drained and bacon is cool enough to handle, remove bacon and chop.
2. Return pot to medium heat. Add 2 teaspoons of bacon fat and butter to the pot. Saute diced onions and 1 teaspoon of salt until soft and translucent.
3. Stir brown sugar, sherry vinegar, 1 teaspoon of thyme leaves, black pepper, and cayenne into onion mix. Add bacon, mix. Add water, mix. Cook until jam is brick-brown bacon color and has a jam consistency (10-15 mins).
4. Remove from heat and stir in balsamic vinegar, olive oil, and remaining 1/2 teaspoon of thyme in jam.


Materials needed for packaging
1/2 pint jars from Walmart. Larger jars are available but I don't want to be blamed for any clogged arteries.
Twine, string or cording in desired color
Jam spread knives from Amazon
Labels from Fork Spoon Bacon
Packing tape for attaching labels to jars

Instructions
Cut labels to size and secure them to the jars using packing tape.
Fill the jars and wait for them to completely cool before putting the lids on. 
Tie the jam spreaders to the jars using cording.
Refrigerate until ready for gifting.


Tuesday, June 9, 2015

Father's Day DIY Gift Ideas

Listen up ladies and gents! Father's Day is coming up and your days of securing the perfect gifts for the men in your life are numbered. Since I DIY'ed gifts for Mother's Day this year, I will also be DIYing gifts for Father's Day. The project? Homemade bacon jam. I first made bacon jam a few months ago for a friendly Grilled Cheese Sandwich cook off and have been craving it ever since. It tastes good on errrrthang. I'll be quadrupling this Boozy Bacon Jam recipe by Spoon Fork Bacon just in case, you know, I need a snack or something. Now I'm off to buy 4 pounds of bacon.


[Boozy Bacon Jam by Spoon Fork Bacon with free printables and instructions.]

Other Fun DIY Ideas for Dad


[DIY Father's Day Typography Glasses from Mr. Printables]


[Printable Father's Day Gift Wrap from Almost Makes Perfect]


[DIY Etched Glass Beer Growler from Apartment Therapy. SUCH a great idea considering how many micro brew places there are in San Diego.]


Tuesday, June 2, 2015

DIY Wall Hanging for the Coolest Kid in Town


Wall hangings. They are all the rage in home decor right now. It's true, just click on this link from Apartment Therapy. I spotted this gorgeous monochromatic hanging on This Cool Kid  and decided to create my own version of it for Parker's room. It's a fairly simple project that could probably be completed in an hour if you have 1 hour to spare. If you're like me and do not have an hour to spare, it will take 3 weeks. Happy Crafting!


Materials Needed:
-Black felt, white felt, coordinating cotton fabric, sewing machine and thread.
-Print out of the quote you want to put on your hanging. I liked the graphic look of this bold font. 
-Freezer paper, pen, iron
-Micro tip scissors
-Wooden dowel cut to size, black cording, craft paint, paint tape
-Craft glue
Optional: A little yarn to make the tassel to make this an ultra-pinterest project.


Step 1: Trace your quote onto the non-wax side of a piece of freezer paper. 


Step 2: Iron your freezer paper waxy side down onto the white felt. This makes the felt 1000% easier to cut. 


Step 3: Cut out all the letters using your micro tip scissors. A super sharp pair of scissors is key to making it easier to get in all the nooks and crannies of your letters.


Step 4: Assemble the hanging. Cut the black felt and cotton fabric to the desired size then cut 1 inch off the top of the cotton fabric.  I chose make my wall hanging about the size of a piece of paper (8.5 x 11). Sew the two pieces together leaving a 1/4 inch seam allowance. Flip inside out. 

Step 5: Glue the quote onto the black felt. 

Step 6: Secure the hanging to the dowel using craft glue.

Step 7: Wrap the cording around both ends of the dowel and secure with craft glue or by sewing it.

Optional:

Paint ends of dowel to add a pop of color.

Create yarn tassel to attach to dowel.


Here's the final product hanging on the wall in Parker's room. I love how it turned out and I'm glad I added the tassel and that little bit of yellow paint to add a pop of color. 


Thursday, May 7, 2015

Mother's Day Candy Box DIY + a Few Last Minute DIY Gift Ideas

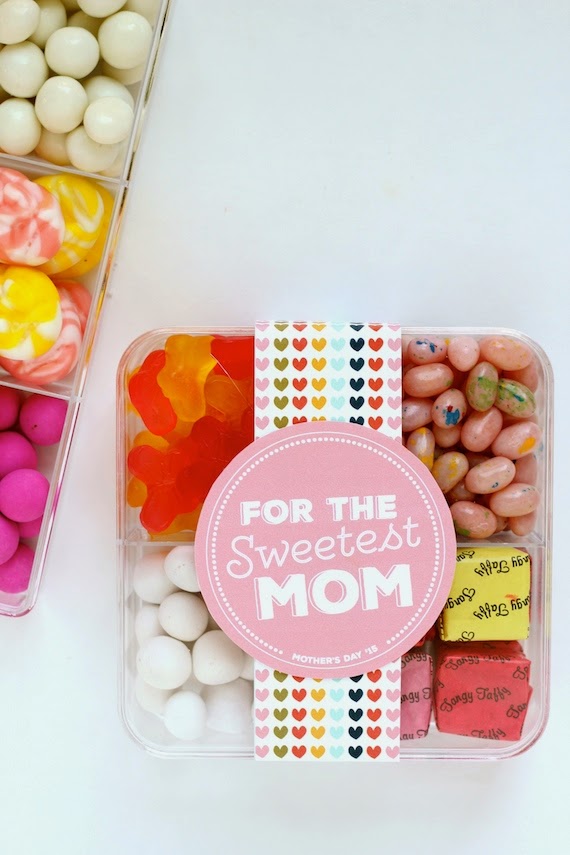
Mother's Day is THIS WEEKEND and I am completely unprepared. There's been a lot going on and I haven't had a chance to create/shop for the mamas in my life. I'm also on a tight budget because Parker's getting his new grill tomorrow and it's going to be $pendy. Never fear! Pinterest is to the rescue. I'm so glad that I stumbled upon this idea for candy boxes on the Julep blog. Thanks, Melanie, for sharing this idea and free printable. Total life saver. My boxes aren't filled with the same candy as Melanie's but they are just as tasty and look just as sweet with the cute labels. The clear boxes were a total score in the $1 bins at Target. Visit the Julep blog for the full tutorial.

Follow me on Pinterest @ marychu33!

Materials Needed
-Clear containers from Target
-Candy of your choice
-Adhesive (I used washi tape)
-Color printer
-Cardstock
-Label file from Julep blog


[Photo credits: Julep]

Some other fun ideas I spotted on Pinterest. 


[Free printable cards from Say Yes blog. Having babies like a boss!]


[Mini Flower Bouquets from Homey Oh My!]


[DIY Semi Precious Stone Soaps from Fall for DIY]