Pages

Related Posts Plugin for WordPress, Blogger...
Showing posts with label tutorial. Show all posts

Tuesday, September 27, 2016

Apple Balloon School Photo Prop

For Parker's first day of preschool photos I wanted to do something a little different than the chalkboard signs I've been seeing on everyone's social media feeds. What better way to celebrate the start of a school year than with a balloon! Spoiler alert: I love balloons. For this project I drew inspiration from these fab balloon projects from Design Improvised and Studio DIY. Ready to get crafting? 

First Day of School Apple Balloon

Materials needed
-Thickers Letterman sticker letters in black (also available in blue and red)
-18" round red foil balloon
-Straw
-Green card stock
-Brown card stock
-Clear tape or zots
*I bought balloon sticks thinking they would be strong enough to support my foil balloon. I was wrong! I also cut two leaves thinking that would look cute but I ended up just using one.

Instructions
-Cut a leaf shape from your green cardstock and a stem from your brown cardstock.
-Insert a straw into the hole of your balloon and inflate. No helium needed!
-Decide what you want you balloon to say. I played around with Preschool 2016 and First Day of School 2016. Cut out the letters you need and line up the words. Make sure you spelled everything right because nothing is worse than misspelled words on a back to school balloon. Nothing.
-Find the center of your balloon and start sticking your letters on. 
-Attach stem and leaf on with clear tape.
-Tape back the tag at the bottom on the balloon so everything is perfectly round. 

TADA! You now have a fab back to school photo prop. Click HERE to see P's first day of preschool photos.

photo prop, back to school photos, apple balloon

photo prop, back to school photos, apple balloon

photo prop, back to school photos, apple balloon

[Can you see me in the reflection on the balloon? Hi!]

Thursday, January 28, 2016

Ring in Lunar New Year with this Musical Chinese Pellet Drum Craft

Lunar New Year is quickly approaching and Parker and I are getting into the spirit by creating DIY pellet drums. Pellet drums are double sided with a pellet connected to each side of the drum. To play the drum, you simply turn the stick between your hands and the pellets swing back and forth, hitting drum head. This musical craft is sure to bring lots of luck and noise to your home!

Ring in the New Year with this DIY Chinese Pellet Drum Kids Craft / Kids friendly craft to celebrate the Lunar New Year 2016, the Year of the Monkey.


Materials needed
-2 Paper bowls (Paper plates would also work)
-Acrylic paint of your choice (red and gold/yellow are lucky New Year's colors)
-Paintbrush
-Tape
-Hot glue gun/craft glue
-2 Monkey images
-Wooden dowel or chopctick
-String
-2 Wooden or plastic beads

Ring in the New Year with this DIY Chinese Pellet Drum Kids Craft / Kids friendly craft to celebrate the Lunar New Year 2016, the Year of the Monkey.

Instructions
1. Paint the exterior side of the bowls and let them dry completely. The drying process will take at least 30 mins depending on how thick you lay on the paint.

Ring in the New Year with this DIY Chinese Pellet Drum Kids Craft / Kids friendly craft to celebrate the Lunar New Year 2016, the Year of the Monkey.

[This is the messiest part of the project. Parker was very concerned about the paint on his hands.]

2. Cut out the monkey images and glue them to the face of each plate.
3. Tie the beads to strings that are 2/3 the diameter of the bowl in length. If your bowl is 6 inches in diameter, your string will be 4 inches long. Adhere the end of the strings to each side of the bowl.

Ring in the New Year with this DIY Chinese Pellet Drum Kids Craft / Kids friendly craft to celebrate the Lunar New Year 2016, the Year of the Monkey.

4. Adhere the wooden dowel/chopstick to the inside of one of the plates.

Ring in the New Year with this DIY Chinese Pellet Drum Kids Craft / Kids friendly craft to celebrate the Lunar New Year 2016, the Year of the Monkey.

Ring in the New Year with this DIY Chinese Pellet Drum Kids Craft / Kids friendly craft to celebrate the Lunar New Year 2016, the Year of the Monkey.

5. Attach the 2nd bowl to the first one using a hot glue gun. 
6. We added some fun pom poms to our bowls to give them a little more flair but that is optional. 

Ring in the New Year with this DIY Chinese Pellet Drum Kids Craft / Kids friendly craft to celebrate the Lunar New Year 2016, the Year of the Monkey.

I had to reinforce Parker's stick with tape because...well because he is a toddler. Enjoy your new pellet drum! Please tag us (@parkerproject) when you post your pellet drum pictures on Instagram. 

Tuesday, October 27, 2015

Over-the-Collar Dog Bandana Tutorial


My BFF Susan has the most adorable double doodle (golden retriever x poodle x 2) named Chewy. As a first time pet parent, Susan has been spoiling Chewy with pricey accessories from Etsy. We've all been there! When I saw how much sellers were charging for dog bandanas, my first thought was, "That is crazy! I can make that!" This is a very easy project I hope you enjoy picking fabrics and patterns to make your dog the hippest on the block. 


[Follow Chewy and her adventures on IG @chewy_doodle. This cute pup has more followers than I do!]

Over-the-Collar Dog Bandana


Materials needed
-11x11 inch square of fabric (you can buy a fat quarter and trim it down or buy a 1/3 yard cut from the bolt and cut it down)
-scissors/fabric trimmer
-grid cutting mat
-fabric pencil
-ruler
-matching thread
-pins

*Note that the amount of fabric required will vary based on the size you want your bandana to be. I started with a 11x11 square in order to have the final bandana size be 9 in for Chewy who is a medium sized dog. 


Instructions

1. Cut your fabric down to size and square it off. Using the selvage edge of the fabric helps immensely.


2. Line up the square of fabric right side up on the grid of your cutting mat. Starting from the corner, mark four inches across and mark inches down. Draw a line between those two points. Do that for two opposite ends of the square. See below.


3. Fold your fabric along the line and sew flat using a 1/4 inch seam allowance. You will end up with a flat triangle on both sides of the square. Sewing the flap down makes it easier to feed the collar through later. Your square should look like this now.


4. Fold your fabric in half so the pointed ends meet. Sew the pointed end shut using a 1/2 inch seam allowance.


5. Now it's time to flip your collar inside out and sew a line about 2 inches down from the top to create a tunnel to feed your collar through. Finish your pointed end with a 1/4 inch seam allowance.  That's it! You are done. 

The first collar I attempted to make was a disaster. My 2nd attempt took 10 minutes. After the 2nd one, I was flying through my stack of squares. This really is a simple project and you can embellish your bandanas with trim, fringe and fancy patterned finishes. The fabric I used for the tutorial was cotton but you an use any material. Happy sewing, Mamas!


Tuesday, June 2, 2015

DIY Wall Hanging for the Coolest Kid in Town


Wall hangings. They are all the rage in home decor right now. It's true, just click on this link from Apartment Therapy. I spotted this gorgeous monochromatic hanging on This Cool Kid  and decided to create my own version of it for Parker's room. It's a fairly simple project that could probably be completed in an hour if you have 1 hour to spare. If you're like me and do not have an hour to spare, it will take 3 weeks. Happy Crafting!


Materials Needed:
-Black felt, white felt, coordinating cotton fabric, sewing machine and thread.
-Print out of the quote you want to put on your hanging. I liked the graphic look of this bold font. 
-Freezer paper, pen, iron
-Micro tip scissors
-Wooden dowel cut to size, black cording, craft paint, paint tape
-Craft glue
Optional: A little yarn to make the tassel to make this an ultra-pinterest project.


Step 1: Trace your quote onto the non-wax side of a piece of freezer paper. 


Step 2: Iron your freezer paper waxy side down onto the white felt. This makes the felt 1000% easier to cut. 


Step 3: Cut out all the letters using your micro tip scissors. A super sharp pair of scissors is key to making it easier to get in all the nooks and crannies of your letters.


Step 4: Assemble the hanging. Cut the black felt and cotton fabric to the desired size then cut 1 inch off the top of the cotton fabric.  I chose make my wall hanging about the size of a piece of paper (8.5 x 11). Sew the two pieces together leaving a 1/4 inch seam allowance. Flip inside out. 

Step 5: Glue the quote onto the black felt. 

Step 6: Secure the hanging to the dowel using craft glue.

Step 7: Wrap the cording around both ends of the dowel and secure with craft glue or by sewing it.

Optional:

Paint ends of dowel to add a pop of color.

Create yarn tassel to attach to dowel.


Here's the final product hanging on the wall in Parker's room. I love how it turned out and I'm glad I added the tassel and that little bit of yellow paint to add a pop of color. 


Tuesday, December 16, 2014

Christmas: Marshmallow Snowman Tutorial

The order of our advent calendar has officially been wrecked. We've gone rogue and are doing activities on whatever day we feel like! Yesterday we were supposed to go to Winter Wonderland at Petco Park but the event has been getting such bad reviews that we stayed home and made these marshmallow snowmen instead. What started as such a simple project ended up being very messy and our supplies were quickly drained...mostly because the kids could not control themselves around M&Ms. They were having so much fun that I could not even be mad at them. Thanks to Luynh & Eden for playing with food with us!


Marshmallow Snowman Tutorial

Materials Needed
-Large marshmallows
-Mini oreos
-Pretzels
-M&Ms
-Food markers
-White frosting
-Popsicle sticks

Instructions
1. Insert popsicle stick into three marshmallows
2. Use white frosting as "glue" to add M&M buttons and an Orea cookie hat 
3. Draw on a face using food markers
4. Insert two pretzels as arms

Your snowman would be the perfect accompaniment to a hot cup of cocoa or can be eaten right off the stick. Enjoy!

Wednesday, November 12, 2014

Thanksgiving: DIY Spoon Turkey Puppets


Gobble gobble! Get your little one excited for Thanksgiving by making these festive and fun Turkey Spoon Puppets. These puppets are simple, inexpensive and fool proof. Kids can play with it as a toy or you can add it to your Thanksgiving tablescape. Ready to get started?


Turkey Spoon Puppets

Materials
Wiggle eyes
Feathers
Felt scraps in red and orange
Paintbrush
Scissors
Masking Tape

Instructions

1. Cut masking tape into varying widths and wrap around the handle of the spoon.
2. Paint the spoon. Let dry for 1 hour. Remove tape once paint is dry.
3. Cut out beak and tattler shapes from felt. Glue beak, tattler and wiggly eyes to the head of the spoon.
4. Glue feathers to the back of the spoon. Let dry for 4+ hours so glue can completely set before playing with the puppets.


[All my supplies were purchased at Michaels except the wooden spoons. Not pictured: scissors and masking tape. Don't forget to use your 40% off coupon!]


[I saran wrapped Parker's high chair tray before I let him paint. The paint is easily removed with warm water and soap. He didn't want to wear the cute apron I bought him so I put him in a throw away shirt. I knew there was a purpose for those tacky souvenir shop tshirts!]


[Parker and Kaden's spoons after painting. All of the colors from the paint set mixed so well together. I love how they turned out. The slight shimmer is fantastic.]


[I placed two glue spots on the spoons and let him add the eyes]


[Waiting for our glue to dry]


Monday, October 20, 2014

Halloween: Custom Toddler Fox Cape Costume

It's hard to do everything by yourself. Sometimes, when life throws you curve balls, you just can't do everything that you intend. It's in those moments that you call on your friends. When those moments come during October and you have absolutely no time or energy to make a custom fox costume, you let your crazy friend who knows how her way around a sewing machine take over. I had such a fun time making this adorable little fox cape for my (fairy) goddaughter using this pattern from HelloDearKids. The only thing I didn't like about the pattern is that it didn't include a seam allowance so I had to free hand a little with the pattern cutting. Otherwise, it was pretty simple and the instructions that came with the pattern were excellent. The material used in the instructions was minky which I'm not a fan of. I used orange and white flannel for the outer layer to give the cape a little more heaviness and shape and a cotton print for the lining. It took me 3 hours to make this from beginning to end. The pattern goes up to size 6T.

Thanks for letting me make this amazing little cape for P. She's going to look amazing in it. It was made with love (there are even little hearts on the lining!) by her fairy godmother.


[I had some material leftover so I created a detachable tail because what's a cute fox without a fluffy tail? I free handed a tail shape using the orange flannel, added some white details for the tip, stuffed it with poly and attached a little elastic loop so I could attach it to the button I added on the back of the cape.]


[I love the lining fabric. Tuan actually picked it out at Joanns! Good eye, Husband.]

Like what you read? Please subscribe to my blog to make sure you don't miss out on any new posts!


Monday, July 29, 2013

Step by Step Organic Fabric Teething Toy Tutorial

Mr. Parks is starting to become a drool/slobber machine. I suspect that his gums are itching and he may be teething. Here are step by step instructions to create an organic fabric teething toy. Don't have the skills to make your own? You can always message me and order some.

What you will need
Organic wooden rings (I ordered mine from Alexa Organics)
Two pieces of 10 in x 4 in fabric (I used minky and organic cotton but you can use two pieces of cotton)
Fabric scissors/Rotary cutter
Pins
Cutting mat
Sewing machine
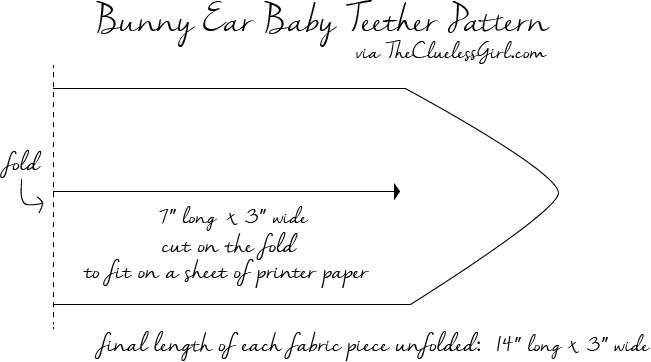
Pattern which can be downloaded here 
**It looks like the link to the original template I used is broken. Above is a link to a similar template via The Clueless Girl

Step-by-step Instructions

[A photo of everything you will need.]


[Cut out pattern and pin it to your fabric. Fabric should be laid right sides together.]


[Cut out pattern.]


[Result after cutting pattern.]


[Remove pins and pattern and sew fabrics together using a 1/4 inch seam allowance. Remember to leave an opening where indicated on pattern.]


[Flip inside out]


[Press and sew again using a 1/4 inch seam allowance.]


[Loop completed bunny ears around your wooden ring. Ta da! All done.]

Now give the teether to your baby or someone else's baby and snap some photos.


[Parks LOVED the teether.]


Wednesday, July 24, 2013

A Quick Quilt with Tutorial Link

Have you ever bought a piece of fabric and thought, "I know exactly what I want to do with this"? That's the reaction I had when this Kokka Japan Beep Beep Black fabric was delivered in the mail. I knew I wanted to make a little quilt for P and today I finally had the chance. Using this tutorial from Red Pepper Quilts, I was able to complete this project in less than 30 minutes.

What you will need:
Sewing machine
Quilting pins
1 1/2 yards print fabric
1 1/2 yards coordinating solid fabric
1 baby size cotton batting (I used the Warm and Natural brand available at Joanns)
Thread that matches your fabric choices
This tutorial from Red Pepper Quilts


[Kokka offers some really great modern prints]


[Beep beep! What little boy would not love this print?]


[He waited patiently in his pack and play while I sewed]


[Completed quilt]


[One thing I know for certain is that this boy will never be cold...ever]